Unreal Engine: Enhanced Input System in C++

Enhanced Input is the new input system provided as a plugin with Unreal Engine 5. And with the upcoming release of 5.1, as this post is written, the old input system has been flagged for deprecation. Thus, this post provides a basic foundation of how to use Enhanced Input within a C++ project for Unreal Engine 5.


Prerequisite

For clarity in this tutorial, I will be using the prefix InputExample for most of the classes. Please name them as fit for your project. And I will be using the Third Person example project for demonstration.

As for the engine version, OS, and IDE used for this tutorial, I am using UnrealEngine 5.0.3 on Pop OS! (an Ubuntu-based Linux distribution), and code editing in Visual Studio Code. This tutorial should work on any UE5+ version, OS (like Windows and Mac), and IDE (like Visual Studio, etc).

And with that out of the way, let’s get started.


Setup

First, enable the Enhanced Input plugin, if it hasn’t been set already, and restart the editor.

The Plugins window can be found under Edit->Plugins->Input.

For those that prefer to add the plugin manually in the IDE, add these lines of code to the Plugins section of your *.uproject file.

*.uproject

"Plugins": [
    {
        "Name": "EnhancedInput",
	    "Enabled": true
    },
]

While we’re still in the IDE, open *.Build.cs file and add "EnhancedInput" to the PublicDependencyModuleNames.

*.Build.cs

PublicDependencyModuleNames.AddRange(new string[]
		{
			"Core",
			"CoreUObject",
			"Engine",
			"InputCore",
            "EnhancedInput"
		});

With the editor open, go to Project Settings->Input. Then scroll down to Default Classes, change the Default Player Input Class from PlayerInput to EnhancedPlayerInput, and Default Input Component Class from InputComponent to EnhancedInputComponent.

And with that, the editor can be closed for now.


Input Mapping Context

Time to start writing some C/C++ code. Open the IDE of your choice and create a new character class that inherent from ACharacter. For this example, I’ll name my AInputExampleCharacter.

I like to categorize each of the systems into little #pragma region for ease of readability, but this is totally optional and up to the programmer’s taste. Also, all of these functions and variables will be protected, so no other classes but its children can access them.

First, we need a pointer to the UInputMappingContext that will be created in the editor later. So start with these lines of code.

InputExampleCharacter.h

#pragma region /** Input */
protected:
    UPROPERTY(EditDefaultsOnly, BlueprintReadOnly, Category = "Enhanced Input")
	class UInputMappingContext* InputMapping;

#pragma endregion

Next, open or create the InputExampleCharacter.cpp file (if not exist already) and scroll down to SetupPlayerInputComponent function.

Now that we have the pointer to the input mapping context, it needs to be added to the engine’s Subsystem for the LocalPlayer to use. Remove all the codes inside the SetupPlayerInputComponent function, and replace them with these new codes. Also, add these #include so the compiler can find the necessary headers.

InputExampleCharacter.cpp

#include "InputMappingContext.h"
#include "EnhancedInputSubsystems.h"

void AInputExampleCharacter::SetupPlayerInputComponent(class UInputComponent* PlayerInputComponent)
{
    // Get the player controller
    APlayerController* PC = Cast<APlayerController>(GetController());

    // Get the local player subsystem
    UEnhancedInputLocalPlayerSubsystem* Subsystem = ULocalPlayer::GetSubsystem<UEnhancedInputLocalPlayerSubsystem>(PC->GetLocalPlayer());
    // Clear out existing mapping, and add our mapping
    Subsystem->ClearAllMappings();
    Subsystem->AddMappingContext(InputMapping, 0);
}

Compile the code, for now, to ensure there are no unexpected errors that pop up.


InputAction

With the mapping context added, it is time to move on to InputAction. This is similar to the ActionBinding found in the old input system. But instead of creating them in the Project Settings, the new system has the Action created as an object in the project folder, that can be modified at runtime.

When working in the blueprint, the InputAction can be easily accessed as an Input Event. But in C++, we don’t have that convenience. Thus, we must create pointers for these actions and assign them in the editor later.

Depending on the project, you can create an UInputAction* variable, and it would suffice. But I like to have a config file so I could add as many actions as I want in the future, and it would be more manageable.

To start, create a UDataAsset subclass. And I will name my, MyInputConfigData.

MyInputConfigData.h

#pragma once

#include "CoreMinimal.h"
#include "Engine/DataAsset.h"
#include "InputAction.h"
#include "MyInputConfigData.generated.h"

/**
 * Store pointer to Input Action for native binding
*/
UCLASS()
class INPUTEXAMPLE_API UMyInputConfigData : public UDataAsset
{
    GENERATED_BODY()

public:
    UPROPERTY(EditDefaultsOnly, BlueprintReadOnly)
    UInputAction* InputMove;

    UPROPERTY(EditDefaultsOnly, BlueprintReadOnly)
    UInputAction* InputLook;
};

Don’t forget to add the #include for the InputAction header. The INPUTEXAMPLE_API must be replaced with “YOURPROJECTNAME”_API. And I created two example pointers to Move and Look actions. Add as many as you need right here. Compile the code to catch any unexpected errors.

Next, add a pointer to the config file that we just created to the InputExampleCharacter.h file. The object will be created in the editor later.

InputExampleCharacter.h

UPROPERTY(EditDefaultsOnly, BlueprintReadOnly, Category = "Enhanced Input")
class UMyInputConfigData* InputActions;

And with that, these actions can be bound with functions. To do that, open the InputExampleCharacter.cpp file and get back to SetupPlayerInputComponent. Add these lines of code to bind the Move and Look functions.

InputExampleCharacter.cpp

#include "EnhancedInput/Public/EnhancedInputComponent.h"
#include "MyInputConfigData.h"

// Get the EnhancedInputComponent
UEnhancedInputComponent* PEI = Cast<UEnhancedInputComponent>(PlayerInputComponent);
// Bind the actions
PEI->BindAction(InputActions->InputMove, ETriggerEvent::Triggered, this, &AInputExampleCharacter::Move);
PEI->BindAction(InputActions->InputLook, ETriggerEvent::Triggered, this, &AInputExampleCharacter::Look);

Replace AInputExampleCharacter with your character class name.

Now that we have them bound, time to create the Move and Look. These will just be a modified function of existing code in the example project.

InputExampleCharacter.h

#include "InputActionValue.h"

// Handle move input
void Move(const FInputActionValue& Value);

// Handle look input
void Look(const FInputActionValue& Value);

InputExampleCharacter.cpp

#include "InputActionValue.h"

void AInputExampleCharacter::Move(const FInputActionValue& Value)
{
    if (Controller != nullptr)
	{
		const FVector2D MoveValue = Value.Get<FVector2D>();
		const FRotator MovementRotation(0, Controller->GetControlRotation().Yaw, 0);

		// Forward/Backward direction
		if (MoveValue.Y != 0.f)
        {
			// Get forward vector
			const FVector Direction = MovementRotation.RotateVector(FVector::ForwardVector);

			AddMovementInput(Direction, MoveValue.Y);
		}

		// Right/Left direction
		if (MoveValue.X != 0.f)
		{
			// Get right vector
			const FVector Direction = MovementRotation.RotateVector(FVector::RightVector);

			AddMovementInput(Direction, MoveValue.X);
		}
    }
}

void AInputExampleCharacter::Look(const FInputActionValue& Value)
{
	if (Controller != nullptr)
	{
		const FVector2D LookValue = Value.Get<FVector2D>();

		if (LookValue.X != 0.f)
		{
			AddControllerYawInput(LookValue.X);
		}

		if (LookValue.Y != 0.f)
		{
			AddControllerPitchInput(LookValue.Y);
		}
	}
}

Compile the code, and it is time to hook everything up in the editor.


Finalizing

Open the project in the Editor, and time to create the MappingContex and InputAction objects.

Create 2 InputActions with the Value Type of Axis2D (Vector2D) by Right-click in the Content Browser -> Input.

Next is the Mapping Context. Create the object and map the actions with appropriate keybinds. Here is my set and which modifiers to use for WASD.

Also, don’t forget about our InputConfig data asset by Right-click in the Content Browser -> Miscellaneous -> Data Asset, and assign the actions appropriately.

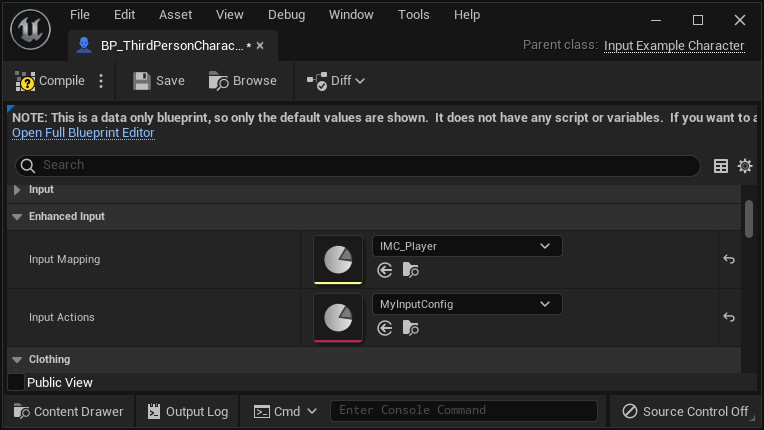
To tie everything up, open the character blueprint, my is BP_ThirdPersonCharacter, and assign the Input Mapping and Input Config objects.

And VOLA! Playtest it and everything should be working as intended. If your mouse’s vertical input is inverted, open Project Settings->Input and uncheck Enable Legacy Input Scales.


Conclusion

The new Enhanced Input system will take time to get used to, in terms of setting it up in C++. But once it’s there, this new system could give more possibility to what type of input setup could be created, and inter-change at runtime. I hope this little tutorial gives a foundational understanding of how it works in C++ and how to setup it up quickly.

Please leave any feedback in the comment section, and have fun coding, fellow game programmers.

48 responses to “Unreal Engine: Enhanced Input System in C++”

  1. This is a fantastically helpful tutorial, thanks!

    I went from “What’s Enhanced Input all about then?” to “My Character is happily walking and looking around” in less than an hour, and more importantly, I understand the *why*.

    (I think it’s not shown above, but the Scalar on the “S” mapping is a -1 on the X-axis).

    Thanks again 🙂

    Liked by 1 person

    1. Thank you for the feedback, I have updated the context mapping image to the correct settings. It must have slipped through during editing.

      Like

  2. Everything was super helpful right up until the end when I feel like a lot got skipped over as far as explaining how you instantiate the Data Asset (which I did figure out) and then where you got your other third person character from, since you were editing a totally different character class earlier in the tutorial. So, in the end, after following along, I have no idea how to finally hook this up. 😦

    Like

    1. Thanks for the feedback. For the character blueprint at the end, it is your player character blueprint. Or in my case, it is the third-person character blueprint that comes by default with the Example project.
      If you don’t already have a character, create a blueprint character derived from the character class that was edited above.
      Hope that help, and let me know if you run into other problem.

      Like

    2. How did you instantiate the Data Asset? I’m stuck on that part.

      Like

      1. To create the Data Asset, right-click in the Content Drawer tab -> Miscellaneous -> Data Asset. Then pick the appropriate class.
        Hope that help and let me know if you have any trouble.

        Liked by 1 person

      2. Same here. When I crate one, it is empty, with zero instructions on what to do with it.

        Like

      3. Solidus_Terminal Avatar
        Solidus_Terminal

        Don’t forget to recompile when you get back into the editor. Otherwise, the data asset will be empty…

        Like

  3. Thank you! I did that, but am now getting ” Warning: Called AddMappingContext with a null Mapping Context! No changes have been applied.” and the InputActions is null.

    I have put them into the BP class directly, and even added them directly to the instance by changing their UPROPERTY to “Edit Anywhere.” But I still get nullptr for both InputMapping and InputActions in void ACMRCharacter::SetupPlayerInputComponent(UInputComponent *PlayerInputComponent).

    Like

  4. The problem seems to be that my GameMode doesn’t know to get the Blueprint version of the Character class, but just uses the C++ version that doesn’t have any data, and I’m not sure how to make the GameMode look at the Blueprint version of the Character.

    Like

    1. If that is the case, in your GameMode blueprint, change the default spawn to the Blueprint version of your character. Also, check in your Project Setting if the default Gamemode is pointed to your GameModeBlueprint.

      Like

      1. Solved. The problem was that I was using a C++ GameMode and needed to derive a Blueprint from that class to allow me to “see” the Blueprint Character class. Thank you for your help and for the helpful tutorial!

        Liked by 1 person

      2. Glad to hear that you got it solved, and thank you for checking out my tutorial.

        Like

  5. Thanks, man

    Liked by 1 person

  6. When I try to bind the enhanced input component, I keep getting the error “pointer to incomplete class type “UMyInputConfigData is not allowed”. I’ve doubled checked all the include headers and they’re correct.

    Like

    1. First, can you check for the spelling of the class? In case, it is misspelled on the other file.
      Second, check if the header file for MyInputConfigData was placed in the private directory. This will prevent access from other classes.
      I will need more details to help debug this. Can you email me screenshots of your setup?

      Like

    2. Add “PrivateDependencyModuleNames.AddRange(new string[] { “EnhancedInput” });” to your Build.cs file.

      Like

  7. thank you, great tutorial: short, precise, condensed. Better than any Youtube video I have seen on this

    Liked by 1 person

  8. This is really good, I have been so distributed over what should be in Blueprints and what should be in C++, honestly your idea of encapsulating every Input Action inside a data asset simply never occurred to me, even though I use Data Assets a lot.

    Liked by 1 person

  9. Epic is very good at taking a simple concept and making it complicated.

    Like

    1. Agree. Personally, I still prefer the old built-in input system. And don’t get me start with the Gameplay Ability System.

      Like

      1. The ability system is so complicated I gave up and rolled my own in less time than I had spent trying to figure it out lol. I guess it’s okay until you involve networking.

        Liked by 1 person

  10. This is great, thank you!
    One thing I’m left wondering is: the whole point is to be able to rebind at runtime, but how do I add input action mappings outside of SetupPlayerInputComponent?

    Liked by 1 person

    1. If you want to rebind another key to an existing action, it can be done outside of the SetupPlayerInputComponent; since the MappinContext is the only object that need to be modified. In my opinion, I would have two UInputMappingContext pointers, one is predefined in Blueprint and acts as the default binding. The other can be modified by user using exisiting MapKey function, then be added to the Input Subsystem by the same method that I’m using in the SetupPlayerInputComponent. Hope that help. 🙂

      Like

      1. I have my original mapping context working in SetupPlayerInputComponent, via ClearAllMappings and AddMappingContext. But then when I try to add another mapping context later, those later inputs never fire. Any ideas? I tried adding the mapping context in C++ and in blueprint, and I’m handling the event in blueprint.

        Like

      2. It could be many things, so let go down a list:
        – [ ] Does the new MappingContext using the same InputActions as the old one? In that case, you may not need to rebind the functions. But if not, get a pointer to the UInputComponent and rebinding the functions to the actions again.
        – [ ] When AddMappingContext, what is the priority? You can play around with this and find out.
        – [ ] Also, you are firing Event/Delegate? Then the function to be bound may need UFUNCTION() macro add to it. It’s just Unreal thing. I forgot sometime.

        Like

      3. I think I found the problem… I’m trying to add mappings from a component that belongs to an actor who is not possessed. Any idea if this is possible? I want to be able to support flexible input based on which component is “active” and not have to route anything through the pawn.

        Like

      4. I also recommend asking around on the Unreal forum as well. Others may have a better solution, or an engineer may answer it themselves.

        Like

      5. Will do, thanks for your help!

        Like

  11. is it the same to apply input to a component instead of a character?

    Like

    1. Yes, pretty much the same. Make sure your component has a function that able to get the UInputComponent from the character actor, otherwise you won’t have the pointer to bind input.

      Like

  12. I am very new to Unreal. Using UE5.2.1. When I got to the Input Mapping Context, I found out that the third person object loaded already has input actions called IA_Move, IA_Turn, and IA_Jump. In All->Content->ThirdPerson->Input.

    So, I assumed I would just delete those. Then it pops up that they have 2 references. One to BP_ThirdPerson and the other to IMC_Default. And asks if I want to Replace or Force Delete them.

    At this point I made a copy of this tutorial and tried replacing them with those in this tutorial.
    Then I removed them from IMC_Default map.

    When I open the DataAsset, is it EMPTY. I have no clue what to enter or how to add items.

    Like

    1. Thanks for following my tutorial. For creating the DataAsset for the InputConfigData, right click in the content browser -> miscellaneous -> data asset. Also make sure to select the InputConfitData class for the property to appear in the window.
      I hope this help and let me know if you need further instruction. 🙂

      Like

      1. I did that. It comes up blank. NO clue what to do after that.

        Like

      2. In the MyInputConfigData.h file, can you double check if your pointers have UPROPERTY(EditDefaultsOnly, BlueprintReadOnly) on them?
        Native C/C++ variables need the UPROPERTY macro from UE for them to show up in the editor.

        Like

  13. FEnhancedInputActionEventBinding& BindAction(
    const UInputAction* Action,
    ETriggerEvent TriggerEvent,
    UObject* Object,
    FName FunctionName)
    For some reason, when I was using this function, the last argument he asked me to pass in an argument of type FName.

    Like

    1. Correct, since this function’s purpose is to bind the trigger event of the input to a custom function that you created; and it only need the name of the custom function to do it.

      Like

  14. Thanks for sharing this detailed and complete tutorial! Nicely done!

    One comment: I’d advise against modifying Epic’s Engine code, namely Character.h and Character.cpp. The reason is, when Epic updates their engine, and you want to incorporate those changes into your project, you’ll need to merge your changes in with their changes, which can get messy and difficult. In this case, Epic made SetPlayerInputComponent(…) a virtual function, so you can create a C++ class that derives from class ACharacter and override their implementation of SetPlayerInputComponent(…).

    Like

    1. Thanks for checking out the tutorial and provide your feedback. And for your comment, thanks you so much for catching that, the Character.h and Character.cpp file is suppose to be named InputExampleCharacter.h and InputExampleCharacter.cpp. I’ll fix it as soon as possible.

      Like

      1. Excellent! That clears things up for me. Thank you!

        Like

      2. I saw you updated your tutorial. Excellent! One more minor typo: the phrase “or create the MyCharacter.cpp file (if not exist already)” should be replaced by “InputExcampleCharacter.cpp”.

        Like

  15. Thanks for the tutorial. As i see from context, there is no fast/clean way to bind inputs around actor class due to component paradigm.To me it would be great to map bindings directly to PC, using UInputAction*, since in my project i am not actualy possesing any actor by PC, but still wanted to use EI encapsulated withing ASyncTasks , by passing down PC and InputAction*.I guess its time to refactor some code,duh.

    Liked by 1 person

    1. Thanks for checking out the tutorial. And yes, depend on your project, the way to bind the input will vary. Additionally you can bind the input directly in the PlayerController by overriding the SetupInputComponent function. Hope that helps and good luck with your project. 😀

      Like

      1. Nice suggestion, thanks. Yes this completely fell out of my scope, that actual input component can be lazy initialized using EnableInput func, and even auto created by PC for … itself.

        Like

  16. Thank you very much for this tutorial.
    It’s disheartening as a novice who’s just trying to see how UE5 works to see how complicated this stuff is, but I can understand the reasoning behind this system.
    It looks like it can be pretty flexible.
    Thanks for the enlightening easy to follow steps.

    Liked by 1 person

    1. Thank you for checking out my tutorial. I know it is daunting at first when trying to learn UE, especially its C++ side. Hope Epic can improve on that aspect in the future. And wish you the best on your UE journey.

      Like

  17. Thank you for the tutorial!!! It works perfectly but I just have a question. I’m not an expert on C++ so maybe that’s why I’m asking this but, on the look and move functions of the character class, what is this controller variable you are checking on the if statements?

    if (Controller != nullptr)

    Thank you!

    Liked by 1 person

    1. It is a fail-safe in the case of the character is spawned without a controller assigned to it. Therefore the editor/game won’t hard crash.

      Like

Leave a comment

Website Powered by WordPress.com.